goodworksfurniture Decoration and home design ideas

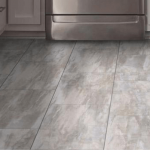
If you’re looking to give your home a fresh new look, installing vinyl floor tiles is a great way to do it. Vinyl tiles are not only durable and easy to maintain, but they also come in a variety of styles and colors to suit any decor. However, installing vinyl floor tiles can be a bit tricky if you’re not familiar with the process. To help you with the installation, here are some tips to keep in mind:
1. Prepare the Subfloor: Before you start installing vinyl floor tiles, make sure the subfloor is clean, dry, and flat. Any imperfections in the subfloor will be visible through the vinyl tiles, so it’s important to fix any cracks or bumps before you begin.
2. Measure and Plan: Take accurate measurements of the room where you’ll be installing the vinyl tiles. Plan out the layout of the tiles beforehand to ensure a smooth and professional-looking finish. It’s also a good idea to lay out the tiles in the room before you start installing them to get a sense of how they’ll fit together.
3. Use the Right Tools: To install vinyl floor tiles, you’ll need a few basic tools, such as a utility knife, a straight edge, and a tape measure. You may also need a pencil and chalk line to help you mark out the layout of the tiles. A roller is also essential for smoothing out the tiles once they’re laid down.
4. Start in the Center: When laying vinyl floor tiles, it’s best to start in the center of the room and work your way outwards. This will help ensure that the tiles are evenly spaced and aligned with the walls. Use a chalk line to create guidelines for the tiles to follow.
5. Follow the Manufacturer’s Instructions: Different types of vinyl floor tiles may have specific installation instructions, so be sure to read and follow the manufacturer’s guidelines carefully. This will help ensure that the tiles are installed correctly and will last for years to come.
6. Leave Room for Expansion: Vinyl floor tiles can expand and contract with changes in temperature, so it’s important to leave a small gap between the tiles and the walls to allow for this movement. Use spacers to create a uniform gap around the perimeter of the room.
7. Seal the Joints: Once all the tiles are in place, use a vinyl floor seam sealer to seal the joints between the tiles. This will help prevent dirt and moisture from seeping in between the tiles and causing damage.
By following these tips, you can successfully install vinyl floor tiles and create a beautiful new look for your home. With a little patience and attention to detail, you’ll have a durable and stylish floor that you can enjoy for years to come.